Monday, 26 August
OBJECTIVE: Students will demonstrate their current level of science knowledge
ASSIGNMENTS:
School City: Use the bookmark under "Granite SD" to find School City. Your log in is your Student ID# (9 #) and your regular log-in password. Click on Science 7 Pre-Test and do your best. :) When completed...
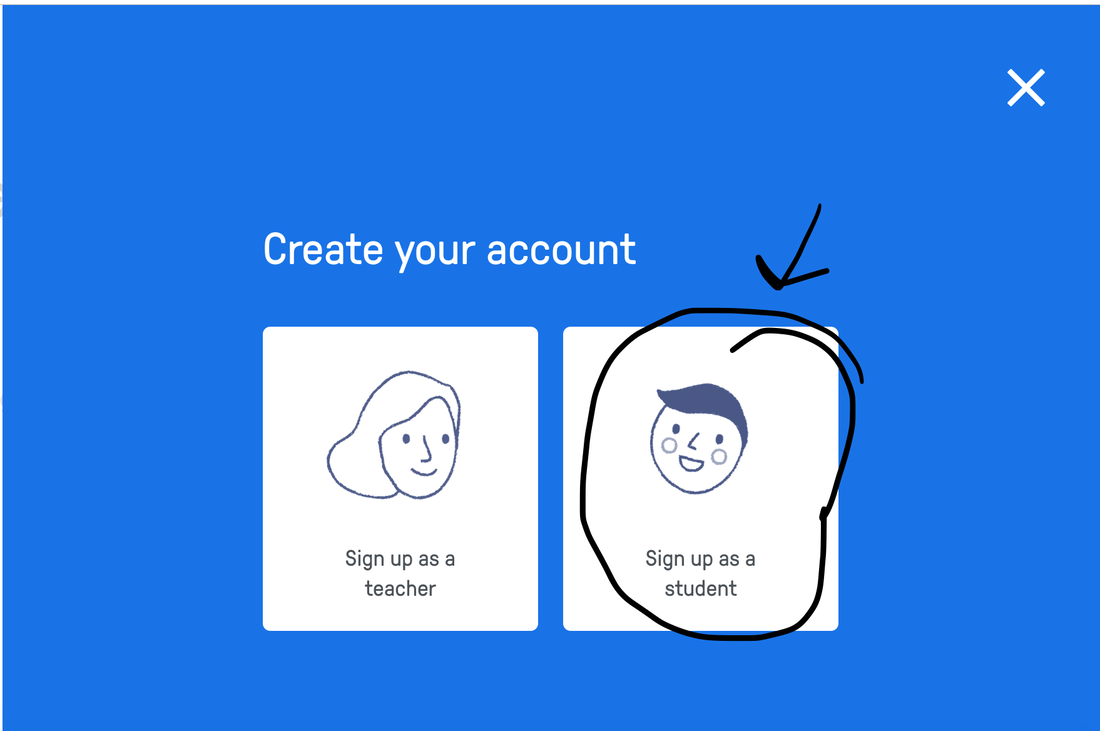
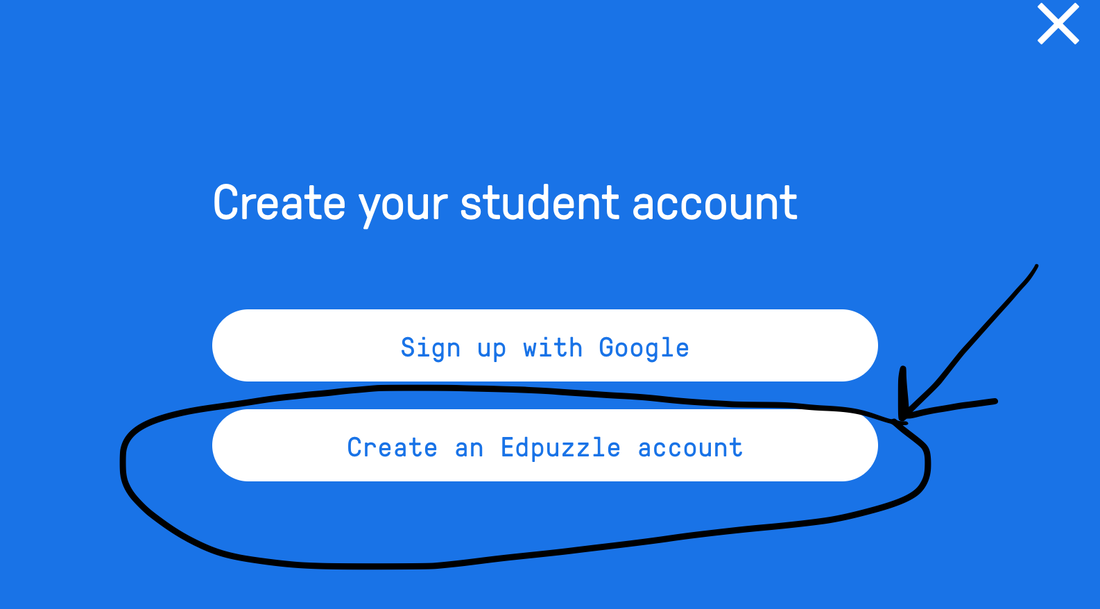
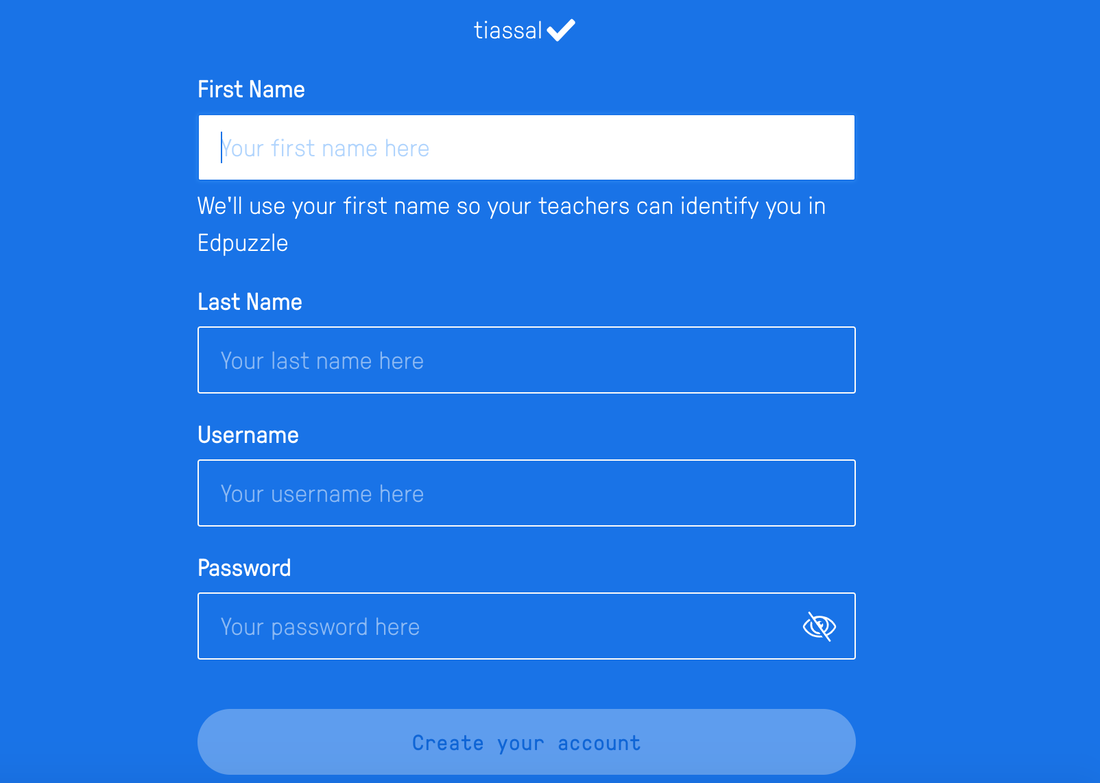
EdPuzzle: We will be using EdPuzzle this semester for our homework. Go to www.edpuzzle.com and click on "Sign Up"
Follow the instructions below. YOUR class code is: waofraw
ASSIGNMENTS:
- School City - Pre-test Science 8
- EdPuzzle - Homework #1
School City: Use the bookmark under "Granite SD" to find School City. Your log in is your Student ID# (9 #) and your regular log-in password. Click on Science 7 Pre-Test and do your best. :) When completed...
EdPuzzle: We will be using EdPuzzle this semester for our homework. Go to www.edpuzzle.com and click on "Sign Up"
Follow the instructions below. YOUR class code is: waofraw

Tuesday, 27 August
OBJECTIVE: Students will learn what tasks are involved in doing a lab
ASSIGNMENTS: Students will complete the observations, group data table, conclusion, and graph for the Bubble Lab we did last Friday. All students, regardless of whether you blew the bubbles or not are required to complete these sections.
INSTRUCTIONS: This was an in-class, full class assignment. If you missed class this day, please see Mrs. Smith for help to complete the assignment.
| bubble.docx |
Wednesday, 28 August
WHAT IS THE RING OF FIRE AND HOW DOES IT WORK?
OBJECTIVE: Students will learn how to begin a new phenomenon
ASSIGNMENTS:
1. Individually - In your science journal write the phenomenon question: "What is the Ring of Fire and How Does it Work?"
2. Individually - Now write the answer to this question. I don't expect you to know the answer but take a good guess. Think about what you know and give it your best effort.
3. Team Effort - Facilitator makes sure that everyone understands the activity. Team Captain, makes sure that each person on the team takes a turn sharing what they wrote down with their team members.
4. Team Effort - As a team discuss the possible answer and come up with a combined answer.
5. Team Effort - Each person picks one color of marker and together the team draws a poster that depicts their answer. Drawings are always better than words for this assignment. Recorder checks with the team about completing the poster and making sure everyone is finished with their portion of the poster.
6. Reporter from Team - The reporter presents to the class their poster. The class listens carefully to hear the ideas of other students in the class.
7. Resource Manager - makes sure that all 8 markers are in the basket and the basket is returned to the counter.
ASSIGNMENTS:
- Students will write an initial answer in their science journals
- Students will create a Team initial answer poster and present it to the class
1. Individually - In your science journal write the phenomenon question: "What is the Ring of Fire and How Does it Work?"
2. Individually - Now write the answer to this question. I don't expect you to know the answer but take a good guess. Think about what you know and give it your best effort.
3. Team Effort - Facilitator makes sure that everyone understands the activity. Team Captain, makes sure that each person on the team takes a turn sharing what they wrote down with their team members.
4. Team Effort - As a team discuss the possible answer and come up with a combined answer.
5. Team Effort - Each person picks one color of marker and together the team draws a poster that depicts their answer. Drawings are always better than words for this assignment. Recorder checks with the team about completing the poster and making sure everyone is finished with their portion of the poster.
6. Reporter from Team - The reporter presents to the class their poster. The class listens carefully to hear the ideas of other students in the class.
7. Resource Manager - makes sure that all 8 markers are in the basket and the basket is returned to the counter.
Thursday, 29 August
PANGAEA
PANGAEA MAP
LEARNING OBJECTIVES: I will learn about what Pangaea is and how it has to do with fossils, tectonic plates, and the continents of the world. I can answer the questions about Pangaea and create a map of the Pangea based on the migration of animals/plants over time.
MATERIALS NEEDED:
1. Cut out the continents and see if you can put them together and make one continent. There are clues on each continent to help you figure out how to put them together on the globe paper
2. On the back of the globe paper, write down why you put these continents or map pieces in this order.
3. Log-into your iPad and go to: http://www.geo.cornell.edu/hawaii/220/PRI/continental_puzzle.html
4. This is an online version of what you have just completed. Copy what you have done on paper here on the screen, then check it by clicking on Pangaea on. How accurate was your guess?
5. Using your paper attempt at Pangaea, build the same version at: www.geo.cornell.edu/hawaii/220/PRI/continental_puzzle.html
6. Now pick at least three of the following to go through what scientists think Pangaea looked like:
brilliantmaps.com/pangaea/
www.classzone.com/books/earth_science/terc/content/visualizations/es0806/es0806page01.cfm?chapter_no=08
https://utah.pbslearningmedia.org/resource/lsps07.sci.ess.earthsys.biogeography/continental-divide-the-breakup-of-pangaea/
https://utah.pbslearningmedia.org/resource/fe7ae96f-b758-49bc-8da6-7b912892e484/fe7ae96f-b758-49bc-8da6-7b912892e484/
7. Now watch these two videos: (TAKE NOTES IN YOUR SCIENCE JOURNAL)
https://utah.pbslearningmedia.org/resource/saga-supercontinents-eons/saga-supercontinents-eons/
https://www.nytimes.com/video/opinion/100000003115176/seeing-the-invisible.html
8. Here's how scientists think that the Earth's crust will move in the future:
www.classzone.com/books/earth_science/terc/content/visualizations/es0807/es0807page01.cfm?chapter_no=08
9.Write down in your journal how the Earth will change in the future, based on the information you have learned today
10.. In your science journal, write down 3 things that you have learned from doing this assignment.
LEARNING OBJECTIVES: I will learn about what Pangaea is and how it has to do with fossils, tectonic plates, and the continents of the world. I can answer the questions about Pangaea and create a map of the Pangea based on the migration of animals/plants over time.
MATERIALS NEEDED:
- colored pencils
- Pangea map
- scissors
- glue stick
- construction paper
- Instruction/answer sheet
1. Cut out the continents and see if you can put them together and make one continent. There are clues on each continent to help you figure out how to put them together on the globe paper
2. On the back of the globe paper, write down why you put these continents or map pieces in this order.
3. Log-into your iPad and go to: http://www.geo.cornell.edu/hawaii/220/PRI/continental_puzzle.html
4. This is an online version of what you have just completed. Copy what you have done on paper here on the screen, then check it by clicking on Pangaea on. How accurate was your guess?
5. Using your paper attempt at Pangaea, build the same version at: www.geo.cornell.edu/hawaii/220/PRI/continental_puzzle.html
6. Now pick at least three of the following to go through what scientists think Pangaea looked like:
brilliantmaps.com/pangaea/
www.classzone.com/books/earth_science/terc/content/visualizations/es0806/es0806page01.cfm?chapter_no=08
https://utah.pbslearningmedia.org/resource/lsps07.sci.ess.earthsys.biogeography/continental-divide-the-breakup-of-pangaea/
https://utah.pbslearningmedia.org/resource/fe7ae96f-b758-49bc-8da6-7b912892e484/fe7ae96f-b758-49bc-8da6-7b912892e484/
7. Now watch these two videos: (TAKE NOTES IN YOUR SCIENCE JOURNAL)
https://utah.pbslearningmedia.org/resource/saga-supercontinents-eons/saga-supercontinents-eons/
https://www.nytimes.com/video/opinion/100000003115176/seeing-the-invisible.html
8. Here's how scientists think that the Earth's crust will move in the future:
www.classzone.com/books/earth_science/terc/content/visualizations/es0807/es0807page01.cfm?chapter_no=08
9.Write down in your journal how the Earth will change in the future, based on the information you have learned today
10.. In your science journal, write down 3 things that you have learned from doing this assignment.
Friday, 30 August - SCIENCE FRIDAY
Today's Priorities ARE:
1. School City Science Pre-Test
2. Pangaea Map
3. EdPuzzle Homework #1 "The Earth"
4. Honor Students: Start Earthquake and Volcano Tracking
Students are required to have items 1 - 3 completed. Any uncompleted work becomes homework!
1. School City Science Pre-Test
2. Pangaea Map
3. EdPuzzle Homework #1 "The Earth"
4. Honor Students: Start Earthquake and Volcano Tracking
Students are required to have items 1 - 3 completed. Any uncompleted work becomes homework!
Tuesday, 3 September
HOMEWORK FOR THE WEEK: EdPuzzle #2 "National Geographic: Plate Tectonics"
DUE: Monday, 9 September
LEARNING OBJECTIVES:
1. Map a key on your map. Use a triangle to depict volcanoes and a circle to depict an earthquake
2. Go to the following USGS site and find 5 earthquakes per day. Fill in your chart with the appropriate information.
3. Find each earthquake's location on your map. When you find the location, using the coordinates, draw a circle and write the number you have assigned for the earthquake from your chart on the map in the proper location.
3. Go to the following Smithsonian site and find 2 volcanoes per day. Fill in your chart with the appropriate information.
4. Find the location of each volcano on your map. Draw a triangle at the location and write inside the triangle the number you have assigned on your chart.
E, After tracking the earthquakes and volcanoes for the past 10 days, have you noticed anything? Are there any patterns you are seeing on your map?
- Students will learn how the concept of Plate Tectonics was discovered
- Students will learn how to track earthquakes and volcanoes
- Cornell Notes on "Alfred Wegener" video
- Science Journal notes on "Plate Tectonics" Reading
- Earthquake/Volcano Tracker (5 recorded earthquakes and 1 recorded volcano)
1. Map a key on your map. Use a triangle to depict volcanoes and a circle to depict an earthquake
2. Go to the following USGS site and find 5 earthquakes per day. Fill in your chart with the appropriate information.
3. Find each earthquake's location on your map. When you find the location, using the coordinates, draw a circle and write the number you have assigned for the earthquake from your chart on the map in the proper location.
3. Go to the following Smithsonian site and find 2 volcanoes per day. Fill in your chart with the appropriate information.
4. Find the location of each volcano on your map. Draw a triangle at the location and write inside the triangle the number you have assigned on your chart.
E, After tracking the earthquakes and volcanoes for the past 10 days, have you noticed anything? Are there any patterns you are seeing on your map?
Alfred Wegener
INSTRUCTIONS:
1. After we watch and take Cornell Notes on this video about Alfred Wegener. Put these notes in your binder.
2. Now we will read about Plate Tectonics. Click here and read about how plate tectonics work...
3. While reading, take notes in your science journal on your next right page of your journal. You will need to find keywords and definitions, and add any drawings that will help you understand this concept.
Wednesday, 4 September
OBJECTIVES:
- Students will learn how to track earthquakes and volcanoes
- Students will continue to learn about how Plate Tectonics works
- Track 7 earthquakes and 4 volcanoes on your tracking sheet
- Complete 1 station from Plate Tectonic activities list
PLATE TECTONIC ACTIVITIES:
1. Watch the film and take notes on Cornell Notes Paper (papers are two sided). Be sure to write the title of the film before starting the film. After watching each film write a summary and make connections to what you already know about Plate Tectonics.
Film #1: Plate Tectonics - Introduction
Film #2: Plate Tectonics - Further Evidence
Film #3: Life on Fire: Tectonic Volcanoes
Film #4: Plate Tectonics - Hawaii Archipelago
2. Plate Tectonics - Drawing the Plates -
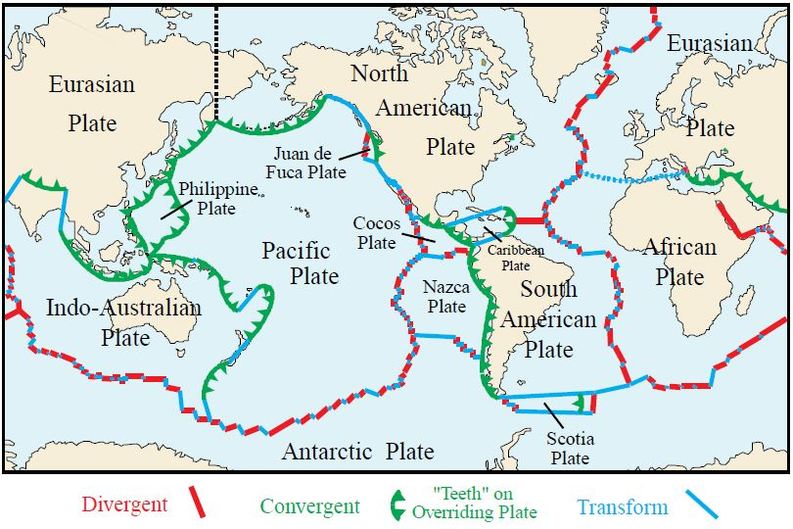
You will need your Earthquake/Volcano Map and three color pencils to do this activity. Using the map below draw the same colored boundaries on your own map. Be sure that you create a key on your map identifying the types of boundaries and the matching colored lines.
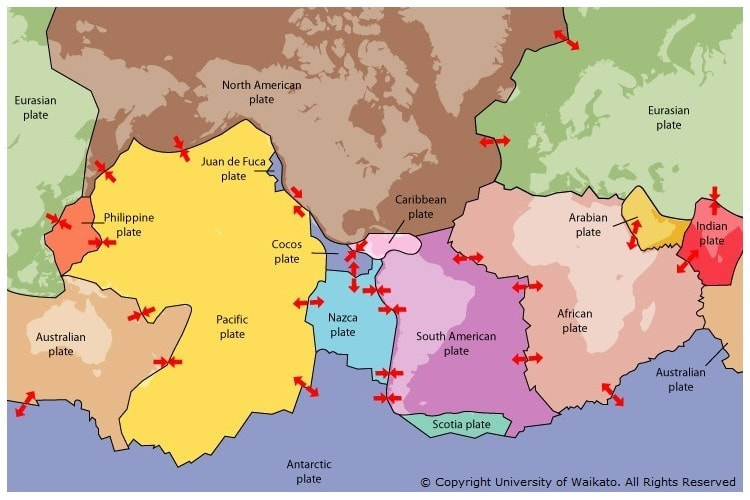
Next use the next map, and copy the arrows shown on this map onto your map. These arrows show which way each plate is currently moving.
Film #1: Plate Tectonics - Introduction
Film #2: Plate Tectonics - Further Evidence
Film #3: Life on Fire: Tectonic Volcanoes
Film #4: Plate Tectonics - Hawaii Archipelago
2. Plate Tectonics - Drawing the Plates -
You will need your Earthquake/Volcano Map and three color pencils to do this activity. Using the map below draw the same colored boundaries on your own map. Be sure that you create a key on your map identifying the types of boundaries and the matching colored lines.
Next use the next map, and copy the arrows shown on this map onto your map. These arrows show which way each plate is currently moving.
3. PLATE TECTONIC ARTICLE: "Real Life Moving Crust..."Read THIS New York Times ARTICLE and write notes on a Cornell Note Paper. Pull all of the science facts and information from the article and make a bullet point list. Look for information that scientists would need to explain what happened.
4. Work through this Plate Tectonic's Interative Lesson
5. Cut and paste the pictures for each of the boundary types and paste them in the next left page of your science journal. Be sure that you write down 2 geologic activities that happen at each boundary next to the pictures, along with a real life example found on Earth.
| plate_tectonic_boundary_types.docx |
Thursday, 5 September
OBJECTIVES:
Students will continue to learn about Plate Tectonics
ASSIGNMENTS:
Students will complete 2 of the Plate Tectonics Activities that they have yet to do. See the list above.
Students will continue to learn about Plate Tectonics
ASSIGNMENTS:
Students will complete 2 of the Plate Tectonics Activities that they have yet to do. See the list above.
Friday, 6 September
OBJECTIVES:
Students will continue to learn about Plate Tectonics.
ASSIGNMENTS:
Students will complete 2 of the Plate Tectonics Activities that they have yet to do. See the list above.
Students will continue to learn about Plate Tectonics.
ASSIGNMENTS:
Students will complete 2 of the Plate Tectonics Activities that they have yet to do. See the list above.
Monday, 9 September
OBJECTIVES:
- Students will continue to learn about Plate Tectonics
- Students will learn about the characteristics of each layers of the Earth
- Students will complete PBS Learning Media's "Dynamic Earth"
- Students will take Cornell Notes while complete "Dynamic Earth"
INSTRUCTIONS:
1. Students will go to PBS Learning Media's Dynamic Earth and work through each section: Intro, Earth's Layers, Plate Tectonics, Plates and Boundaries; Slip, Slide and Collide, and finish up by taking the test.
2. Print the Test when you have completed it. You will print it as a PDF.
3. Once you have Printed your test, you will upload it to Canvas. See Mrs. Smith you if need help to upload to Canvas. :)

Tuesday, 10 September AND Wednesday, 11 September
OBJECTIVES:
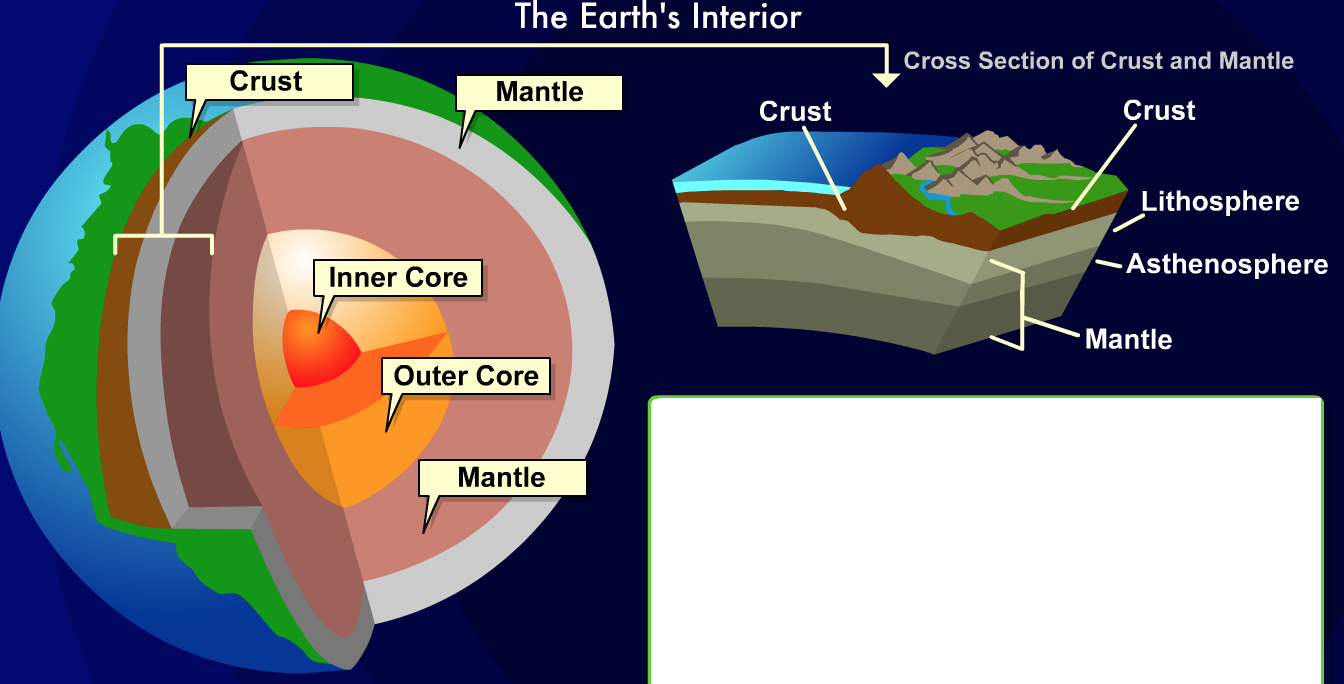
Students will build a scale model of the layers of the Earth.
ASSIGNMENTS:
Each pair of students will create a pizza slice of the Earth.
INSTRUCTIONS:
1. Each pair will research the following information:
Your notes from Dynamic Earth, your notes from your science journal, and the following websites:
K-12 "Earth Layers"
USGS "Inside the Earth"
Ducksters
National Geographic Kids
National Geographic Inside the Earth
Geography 4 Kids
Students will build a scale model of the layers of the Earth.
ASSIGNMENTS:
Each pair of students will create a pizza slice of the Earth.
INSTRUCTIONS:
1. Each pair will research the following information:
- What are each of the layers made of? (the more detail the better)
- If you were to dig a hole from the top of the crust to the top each specific layer, how far would you have to dig (use km, not miles)?
- What is the depth of each layer?
- What is the lithosphere and where is it found?
- What elements make up the lithosphere?
- What is the asthenosphere and where is it found?
- What elements make up the asthenosphere?
- What state of matter is found in each of the layers, including the lithosphere and the asthenosphere?
- What layer is responsible for the magnetic field?
- What layer has convection occurring in it?
- How is the oceanic crust different than the continental crust?
- Find one more detail for each of the layers.
Your notes from Dynamic Earth, your notes from your science journal, and the following websites:
K-12 "Earth Layers"
USGS "Inside the Earth"
Ducksters
National Geographic Kids
National Geographic Inside the Earth
Geography 4 Kids
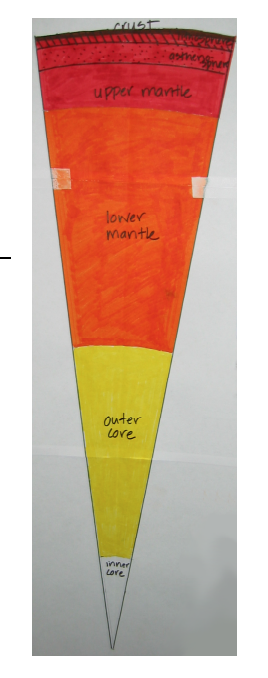
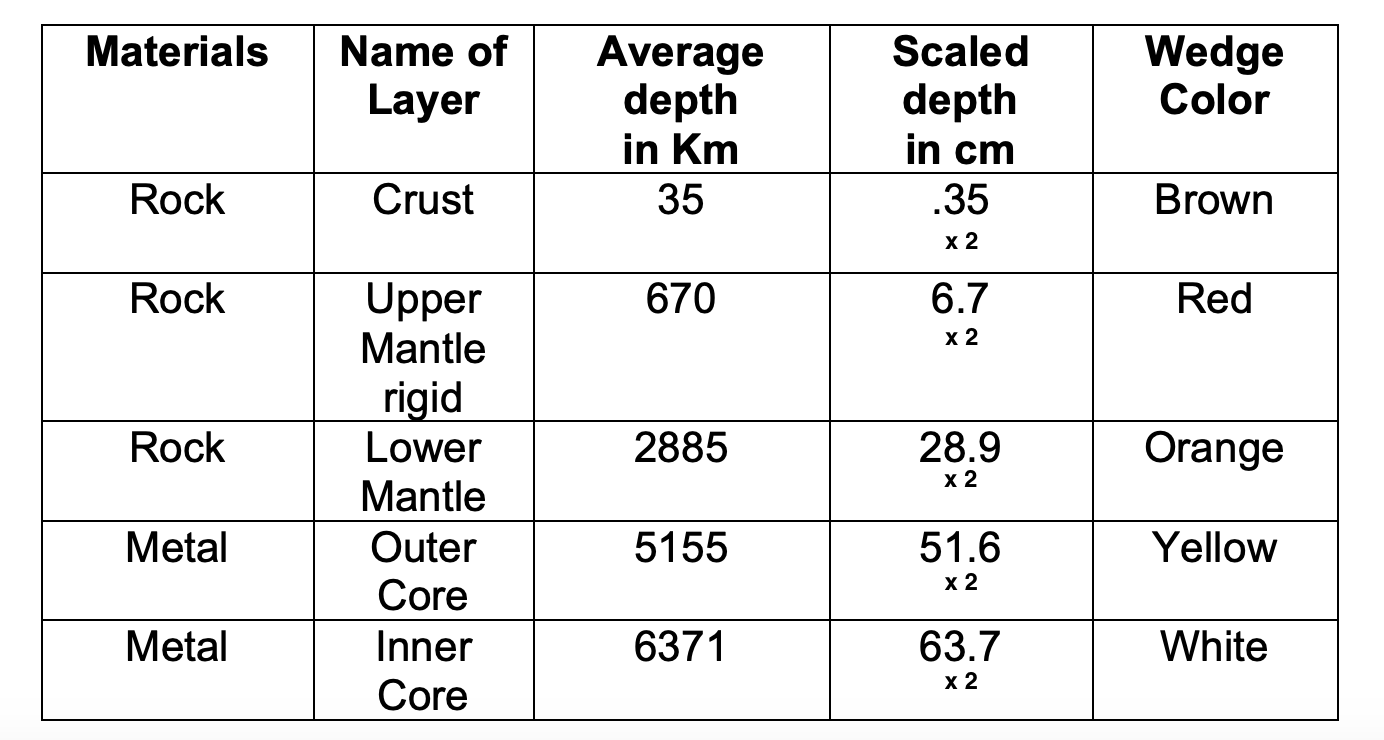
NEXT, together you will take the large paper and create a slice of the earth. Here are the dimensions you will use. This will create a smaller, but scaled version of the earth. The scale we will work with is 50 kilometers (km) = 1 centimeter (cm).
1. You will take the scaled depth in cm and multiple it by 2 in order to get the total number of centimeters for each of the layers. Write down your answer, then start measuring the crust from the top of the paper. Draw a line that will show where the crust ends and the Upper Mantle begins.
2. Take the scaled depth of the Upper Mantle and multiply it by 2. Write down this number, then measure this number of cm starting from the line you just drew for the end of the crust. Draw your next line that will show the end of the Upper Mantle and start of the Lower Mantle.
3. Take the scaled depth of the Lower Mantle and multiply it by 2. Write down this number, then measure this number of cm starting from the line you just drew for the end of the Upper Mantle. Draw your next line that will show the end of the Lower Mantle and start of the Outer Core.
4. Take the scaled depth of the Outer Core and multiply it by 2. Write down this number, then measure this number of cm starting from the line you just drew for the end of the Lower Mantle. Draw your next line that will show the end of the Outer Core and start of the Inner Core.
5. Take the scaled depth of the Inner Core and multiply it by 2. Write down this number, then measure this number of cm starting from the line you just drew for the end of the Outer Core. Draw your next line that will show the end of the Inner Core and start of the Lower Mantle.
6. Using the information that you gathered for each layer of the earth, add the information to your scale model.
7. Once you have added your information. Color each layer according to the chart below. Please do not color over what you have written.
8. If there is time, fold your scale model in half and then open it up. You will use the bottom center fold as the tip of the earth's wedge. Take your meter stick and put one end on this point and the other end at the top corner of the paper. Draw a straight line. Do the same for the other side of the paper. Your goal is to have a pizza slice of the earth. See the photo above for an example.
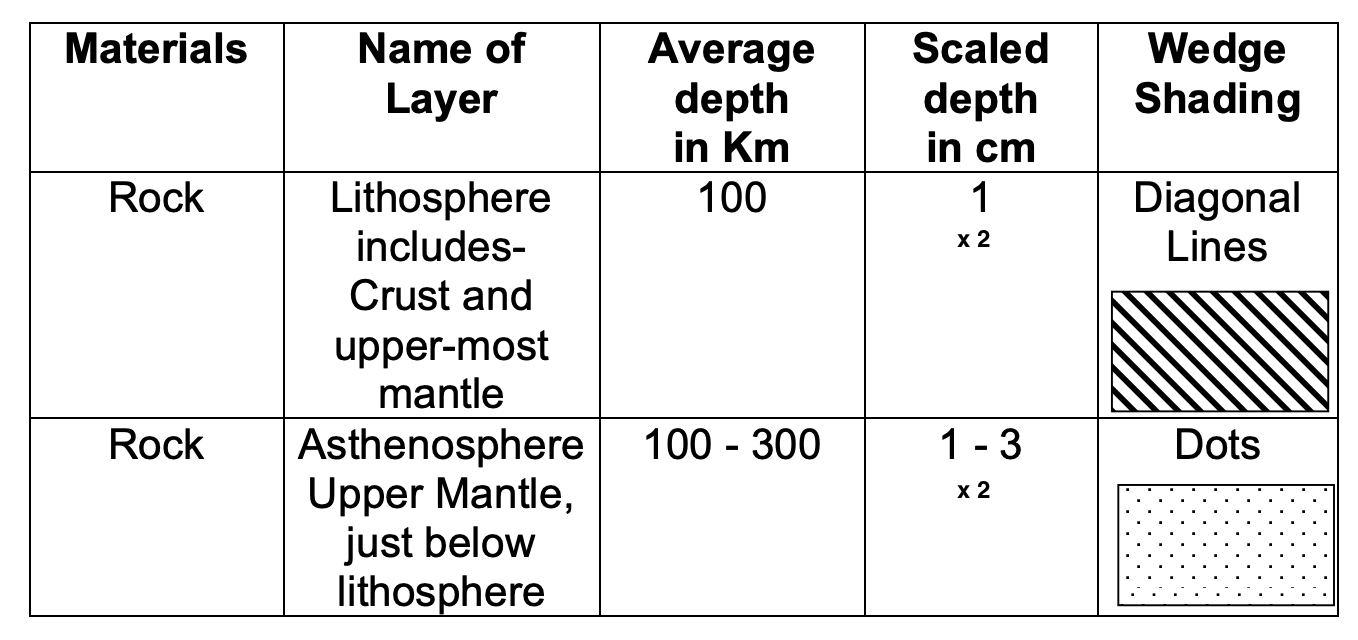
EXTENSION:
Now that you have the basic layers completed, add in the Asthenosphere, and the Lithosphere using the information below. You will also want to answer the questions above for each of these layers in order to complete this portion of the assignment. Add the information to your earth's wedge.
Now that you have the basic layers completed, add in the Asthenosphere, and the Lithosphere using the information below. You will also want to answer the questions above for each of these layers in order to complete this portion of the assignment. Add the information to your earth's wedge.
Thursday, 12 September
OBJECTIVES:
- Students will determine their level of understanding for the phenomenon question: "What is the Ring of Fire and How Does It Work?"
- Students will review Vocab Words necessary for answering the question: "What is the Ring of Fire and How Does It Work?"
- Students will review their original questions about the Ring of Fire and How it Works and determine if they can answer the questions.
- Students will share their questions/answers with their team members
- Teams will determine a science answer with evidence for "What is the Ring of Fire and How Does it Work?"
- Teams will create a poster (drawings are better than a lot of words) depicting their answer to the phenomenon question.
- Teams will present their posters to the class for class discussion
- Students will complete Vocab Word Cards
INSTRUCTIONS:
1. Class watches two brief video about the Ring of Fire(National Geographic) (NOAA) and takes notes.
2. Students look at their questions from the initial answer and see if they can answer these questions.
3. Students share their questions and answers with team mates.
4. Together, teams come up with a science answer with evidence for the question "What is the Ring of Fire and How does it Work?"
5. Teams create a poster that depicts their answer to the phenomenon question and present their posters to the class.
6. Students work on creating Vocab Cards for the following words: Plate Tectonics, Earthquake, Volcano, Divergent Plate Boundary, Convergent Plate Boundary, Transform Plate Boundary, Crust, Lithosphere, Asthenosphere, Upper Mantle, Lower Mantle, Outer Core, Inner Core, Oceanic Trench (Extension), Mid Atlantic Ridge (Extension)
7. Students glue Vocab Cards in their science journals.
Friday, 13 September
OBJECTIVE:
1. The Final Answer is considered a test. Students will write an essay to explain their understanding and evidence for the science question: "What is the Ring of Fire and How Does it Work?"
2. Once their answer is complete, students will complete the rubric for the phenomenon. They will circle the corresponding level of understanding for each of the required pieces of information.
3. Students will complete the Self-Assessment Form for the phenomenon.
4. The Final Answer, the Rubric, and the Self-Assessment Form will be stapled together and turned in to Mrs. Smith
- Students will demonstrate their understanding of the phenomenon question "What is the Ring of Fire and How Does it Work?"
- Students will evaluate their efforts and knowledge during the phenomenon "What is the Ring of Fire and How Does it Work?"
- Students will complete a Final Answer for the question, "What is the Ring of Fire and How Does it Work?"
- Students will complete the Rubric for "What is the Ring of Fire and How Does it Work?"
- Students will complete the Self-Assessment for "What is the Ring of Fire and How Does it Work?"
1. The Final Answer is considered a test. Students will write an essay to explain their understanding and evidence for the science question: "What is the Ring of Fire and How Does it Work?"
2. Once their answer is complete, students will complete the rubric for the phenomenon. They will circle the corresponding level of understanding for each of the required pieces of information.
3. Students will complete the Self-Assessment Form for the phenomenon.
4. The Final Answer, the Rubric, and the Self-Assessment Form will be stapled together and turned in to Mrs. Smith
FINAL ANSWER
For the Final Answer, your test for this phenomenon, you will need to be in the classroom to complete this assessment. You have a choice of either writing it out on paper (provided by Mrs. Smith) OR doing it on CANVAS. Your choice. I know some of you like to use paper and pencil, while others would rather type out your answer. If you are absent, because this is a test, you will need to set up a time to come in and make the assessment up in the classroom.
RUBRIC
Please circle the level of understanding you have for each of the pieces of required knowledge.
| what_is_the_ring_of_fire_and_how_does_it_work___-_sheet1.pdf |
STUDENT SELF ASSESSMENT
Please answer each of the questions on the assessment based on your level of effort, the evidence that you would liked considered to prove you have understood the required science concepts.
| studentselfreportingform.pdf |